Have you been in a situation where you wished you could easily import all your banking transactions at a go into QuickBooks without combing through each transaction in order to save time and channel your effort to what’s more productive?
QuickBooks has made it applications easier for anyone to connect to using the API integration available to any developer.
This guide contains basic pictorial steps to import your bank statement into QuickBooks.
When you launch the application, here is how the window looks like with relevant label and their respective descriptions.
A: This label shows all the banks from which you select the bank account you want to import your statement.
B: Here you select the period within which all transactions in your statement falls in.
C: Bank Statement: This is the button that lets you upload bank statement from your computer.
You need follow the pre-built format acceptable by the application before it can successful import your bank statement in QuickBooks.
D: The “Get Template” explains how the format of the bank statement is expected to be, in columns, before you can easily import into QuickBooks.
E: This is where you check all transactions fields imported for accuracy.
F: The “Green” and “Red” colour signify any error or shows that your column is valid after importing the bank statement.
II: How to import your bank statement.
- On the home screen, click label A, B and use C to load the statement as shown on the snapshot above.
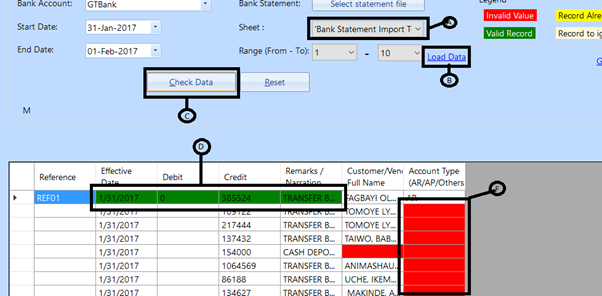
- Follow the guide on the snapshot below:
- A: Select the sheet name “Bank Statement Import”. On your spread sheet, you will see the name at the footer section.
- B: Load data lets you import the statement shown below in excel format.
- C: Use the “Check Data” to verify your import for error.
- D: This indicates successful transactions
- E: This indicate areas you should correct
Once all errors are resolved, the save button appears for you to click and run the import.
Here is a bank statement showing the transaction imported successdully.


