Discover the Loan Calculator in Nigeria Naira and save yourself the stress of using Excel or calculator to determine your loan repayment schedule.
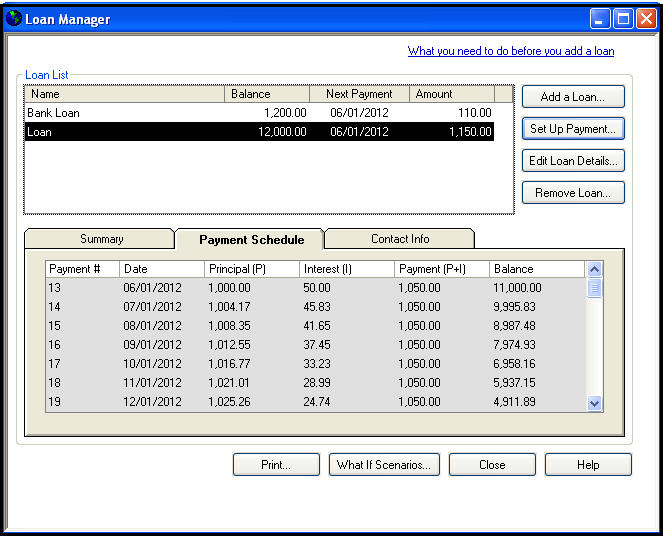
Are you looking for loan repayment calculator software that will help you track period payment of your principals, interest expenses and any additional fees or charges which you can compare with the lenders loan schedule for reconciliation purposes? Here is a review of how QuickBooks Loan Manager works:
What the Loan Manager does:
When a loan is repaid in regular fixed payments, this repayment usually includes both compounded interest and principal installments for the period.
As each successive payment is made the interest portion gradually decreases and the principal portion increases. The QuickBooks Loan Manager creates an Amortization schedule for the duration of the loan, showing how much of each payment is applied to principal, interest and escrow (additional fees related to the loan). It also allows you to make payments for either the regular scheduled amount, or additional payments, and to run “what-if” scenarios to compare different loan choices.
The Detailed instructions below provide information on how to use Loan Manager to track loans and repayments in QuickBooks.
Prepare the use the Loan Manager:
Before setting up a loan in the loan manager you will need to set up one or more accounts in QuickBooks: one for the loan itself, one for interest expense and one for escrow if applicable. You will also need to make sure you have the lender set up as a vendor.
Create a loan account in your chart of accounts.
Record the initial loan amount. You can do this either by entering the total amount as an opening balance in the New Account window itself, or as a transaction such as a journal entry. Entering it as a journal entry gives you the most flexibility. In either case, make sure the date you enter is the loan origination date.
If payments have already been made against the loan you will need to enter these as well in the form of checks, bills or journal entries.
Next, set up an Expense type account for Interest payments and another for Fees and charges, if none already exist.
Then create a Bank type account for Escrow payments if necessary.
Add a vendor for the bank or financial institution issuing the loan, if it does not already exist in QuickBooks.
Now you are ready to set up the loan in the Loan Manager itself.
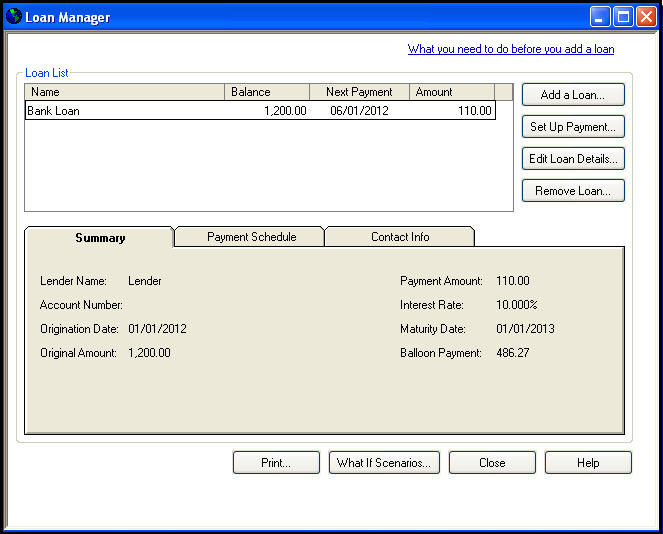
To open the Loan Manager, select Loan Manager in the Banking menu. This opens the main Loan manager window.
Click Add a Loan to begin setting up the loan.
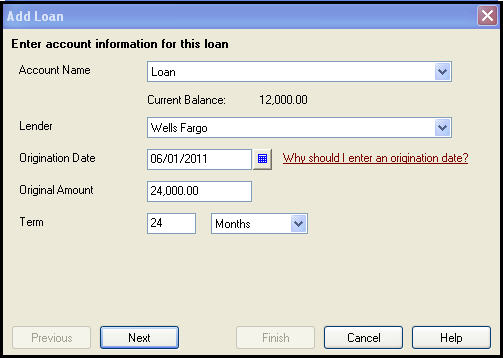
On the first screen entitled Enter account information for this loan:
- From the Account Name drop-down select the name of the Loan account you set up previously.
- Note: The balance for this account automatically populates just below. Make sure this equals the actual loan amount due, after any previous payments.
- From the Lender drop-down select the name of the vendor to which payments will be made.
- In the Origination Date field, pick the date from which the loan originates.
- In the Original Amount field enter the full initial amount of the loan.
- In the Term field enter the time it will take to repay the loan in full in weeks, months or years.
- Enter the appropriate time period of weeks, months or years from the Term drop-down box.
- Click Next to continue.
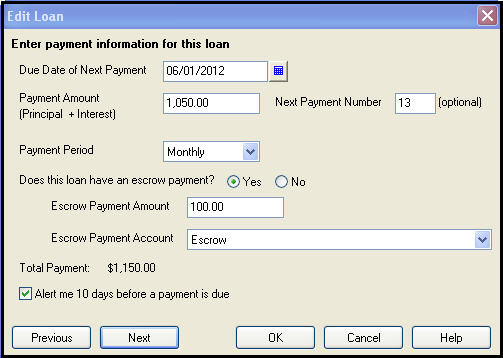
On the next screen entitled Enter payment information for this loan:
- Select the Due date of next payment.
- In the Payment amount field enter the amount that will be paid each period.
- Edit the Next payment number if previous payments have already been made.
- Select a Payment Period from the drop-down list.
- If escrow payments are to be include, select Yes next to Does this loan have an escrow payment?
- Enter the Escrow payment amount and the account to which this will be made.
- (Optional) Check the box next to Alert me 10 days before a payment is due.
- Click Next to continue.
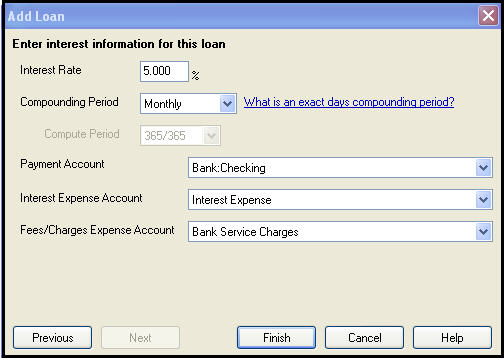
On the next screen entitled Enter interest information for this loan:
- Enter the Interest rate for the loan. For a 5% interest rate, enter “5”(no quotes), rather than “5%” or “0.05”.
- Enter the Compounding period of Monthly or Exact days, depending on what is specified in your loan documentation.
- From the Payment Account drop-down, select the Bank account from you which you will be making payments.
- From the Interest Expense Account drop-down, select the appropriate expense account.
- From the Fees/Charges Expense Account, select the appropriate expense account.
- Click Finish.
You can click Edit loan details to change any of the information you entered when setting up the loan.
The loan details you entered show on the Summary tab at the bottom of the Loan manager.
Click the Payment Schedule tab to view the amortization schedule, showing calculated principal and interest for the full term of the loan. Note the varying amounts of Principal and Interest over the life of the loan.
For Inquiry on how can setup QuickBooks Loan Manager for your business, call 09092942048, 08175420054 or SEND us your request: info@magnetgroupng.com
